Getting Started
To make your journey as part of the Gjensidige's AI & MLOps team as smooth as possible, we've prepared a collection of things you'd need to set-up. This includes the accesses to request, the software to install, the people to contact and anything else that might be useful.
Access requests
There are three environments in which we need to request access:
- my-access-page for Microsoft access packages in production
- my-access-test for Microsoft access packages in test
- request-center for everything else
Everyone should request these accesses:
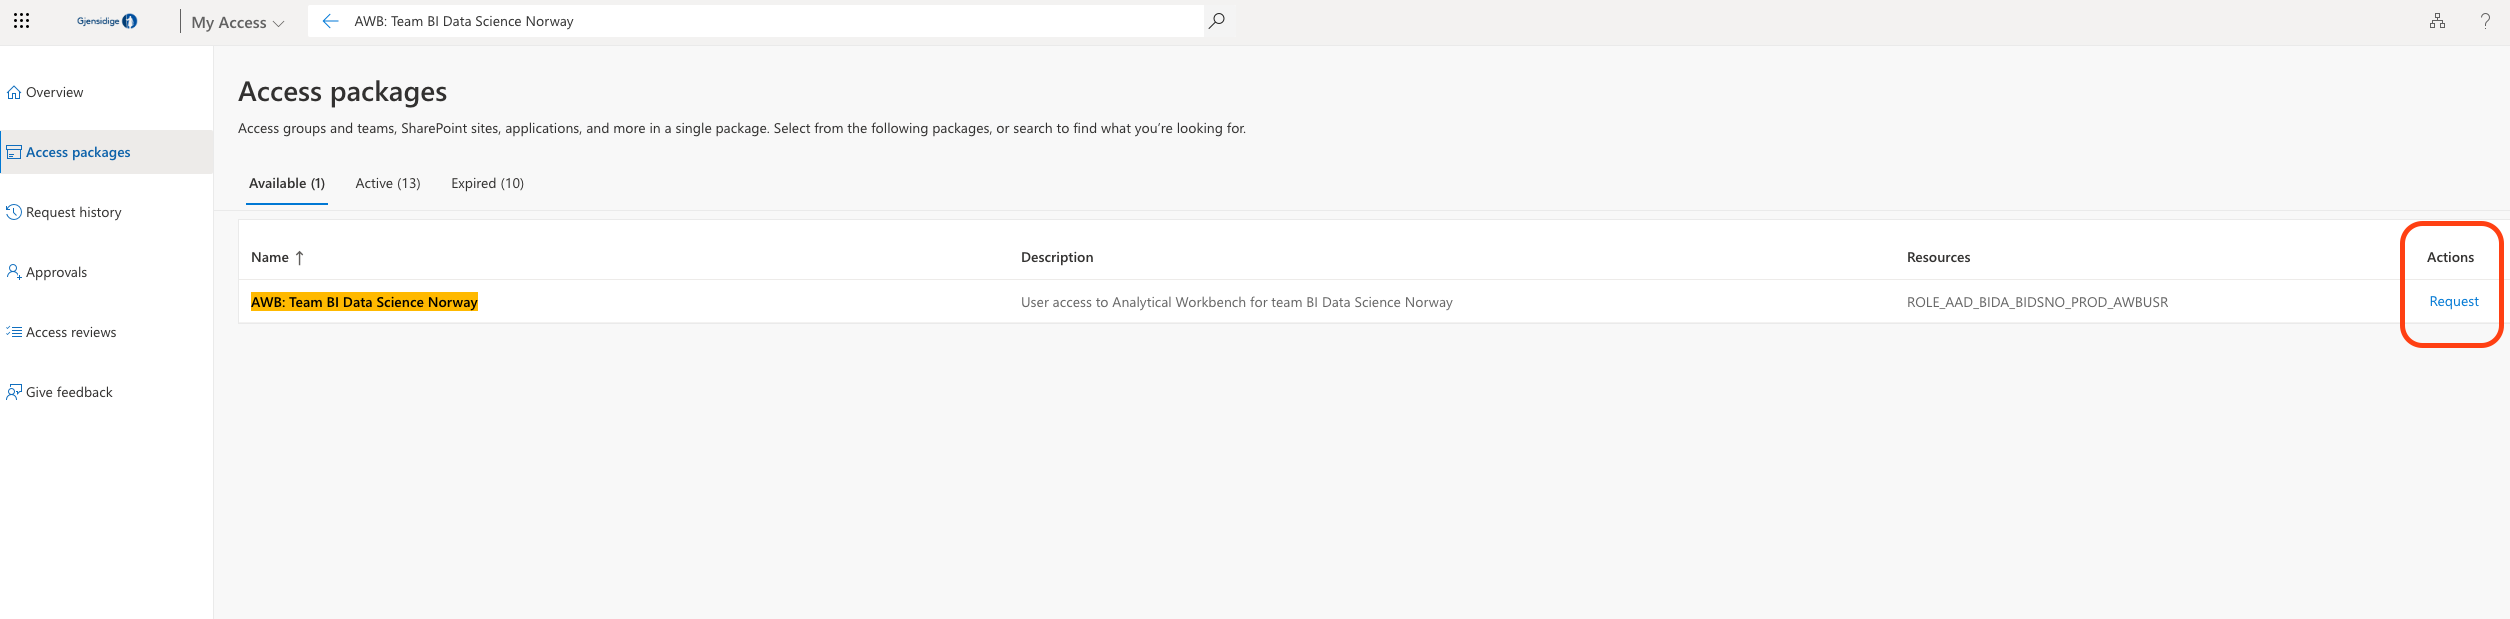
My Access
- AWB: Team BI Data Science Norway - User access to Analytical Workbench for team BI Data Science Norway
- Azure: Team bids - Member (prod) - Access to Azure resources for team bids in prod environment
- Gjensidige: GAP Developer (prod) - Access to the GAP Platform and all tools in the platform
In the myaccess page you should enter the roles into the search field and click on Request. Enter a valid business justification and submit the request.
For our own packages "Bids developer" is a valid such justification.
My Access (Test)
- Gjensidige: GAP Developer (test) - Provides access to GAP tools, such as Grafana (read/write), Splunk, and Azure Container Registry (read)
- Azure: Team bids - Member (test) - Access to Azure resources for team bids in test environment
- Azure: Team bids - Member (sand) - Access to Azure resources for team bids in sand environment
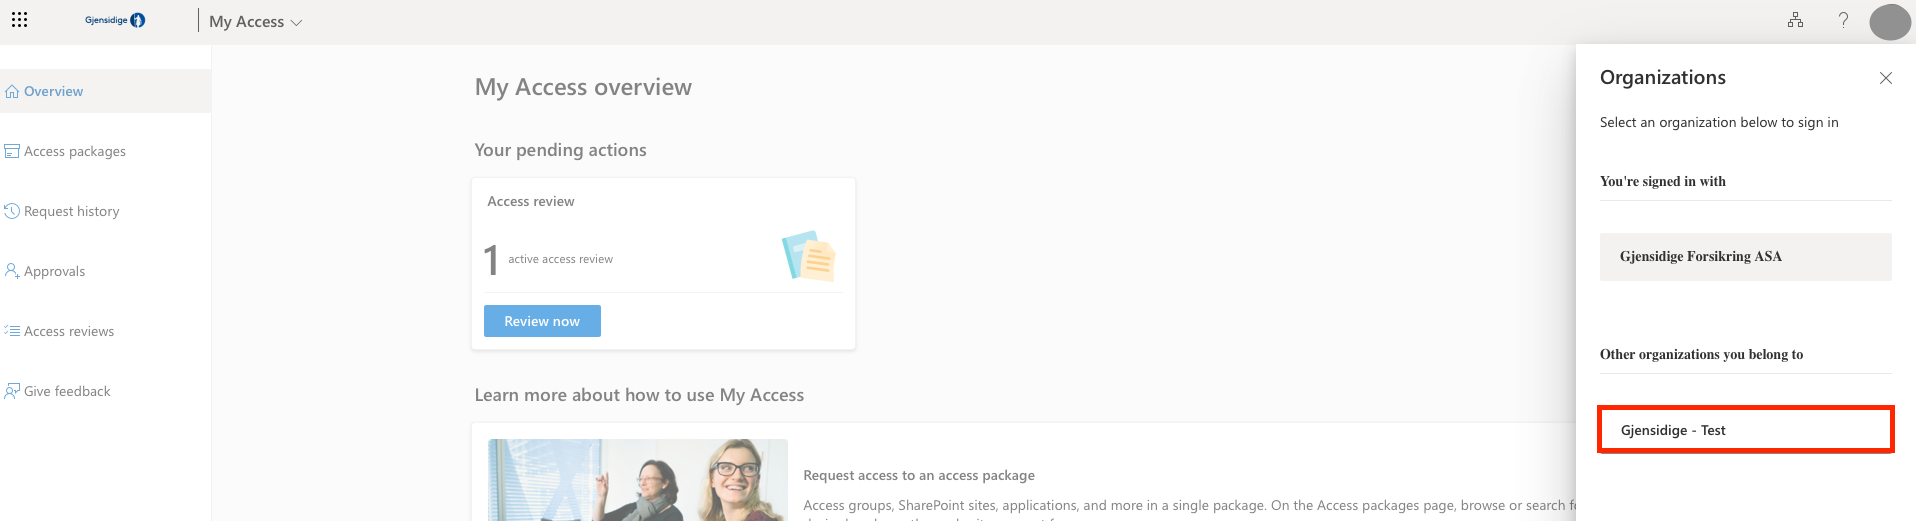
Create your test user if you don't have one already by filling in test-form. You can switch between environments by clicking on your profile picture in the top right corner and clicking the 'Switch Organization' button, followed by selecting 'Gjensidige - Test' Organization. See picture below. To get back to the production environment, change the organization to 'Gjensidige Forsikring ASA'
Identity Now
- Slack - Gives SSO access to Gjensidige Slack Enterprise
- Github Developer - Write access for Github
- Github Enterprise - Read access for Github
- BINO: Norge - Gjensidige Forsikring - This role gives general read access to DB2 IVHP01 / G00V.%, dplat_no
- Jira Atlassian cloud user - Default user access for Jira in Atlassian cloud
- Atlassian cloud user Gjensidige Forsikring - Atlassian cloud Gjensidige Forsikring organization users.
- Confluence Atlassian cloud user - Default user access for Confluence in Atlassian cloud
Software
Mac
The Gjensidige Mac computers allow you to install any software, and we'd recommend getting the following:
Windows
The Gjensidige Windows computers are by default not allowed to install any software that requires elevated privileges. In order to install such software, we have a portal where we request for it and a Software Center that handles the management of the approved software.
Installing software via Software Center
To request access, one should go to request-center.
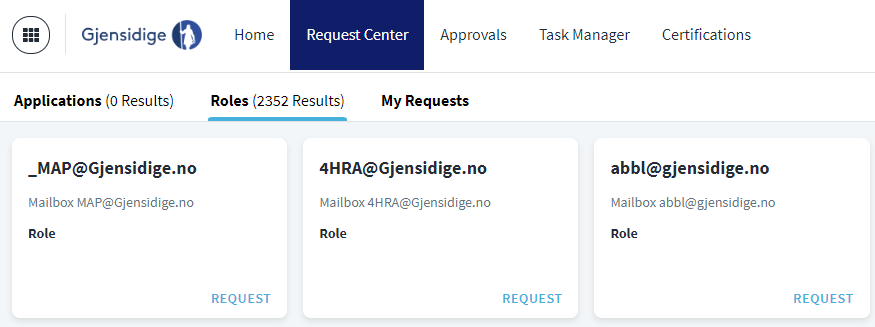
Once your request has been approved, the requested software shall appear in the Software Center.
Installing software via Scoop
Additionally, it is recommended to use scoop which acts as a package manager for Windows. It handles the elevated privileges and lets you get software that would otherwise be unavailable / might not work on Windows.
Recommended software
| Software | Mac | Windows | Additional notes |
|---|---|---|---|
| python | brew install python3 | In Software Center | Needed for python development |
| VS Code | vscode-mac | vscode-win | IDE that can be tailored for pretty much everything |
| PyCharm | pycharm-mac | pycharm-win | IDE Alternative for Pythonistas |
| Git | git-mac | git-win | Must-have to be able to pull&push |
| Gh | gh-mac | gh-win | Easy Github repository management |
| jsonnet | jsonnet-mac | jsonnet-win | Used to compile jsonnet to kubernetes manifestos |
| Postman | postman-mac | postman-win | GUI to query any API |
| Slack | slack-mac | In Software Center | Used for announcements, info and messaging |
| Terraform CLI | terraform-mac | terraform-win | Necessary if executing Terraform commands locally |
| Miro | web-GUI | web-GUI | Access for visual boards |
After you have been granted SSO access you can download Slack and initially join the following channels.
- bi-cloud-data-analytics-platform-announcements
- team-bi-cloud-data-analytics-platform
Github
Please check this step-by-step guide on setting up Github here
Github Notifications
After joining the organization and getting assigned to our team @gjensidige/bi-data-science,
you might notice that you're getting quite a few notifications on a daily basis about repositories you haven't heard about,
requesting for approval or simply updating on the Pull Request status.
To make notifications more manageable we suggest to first disable the automatic watch for repositories and teams at the Github notification settings.
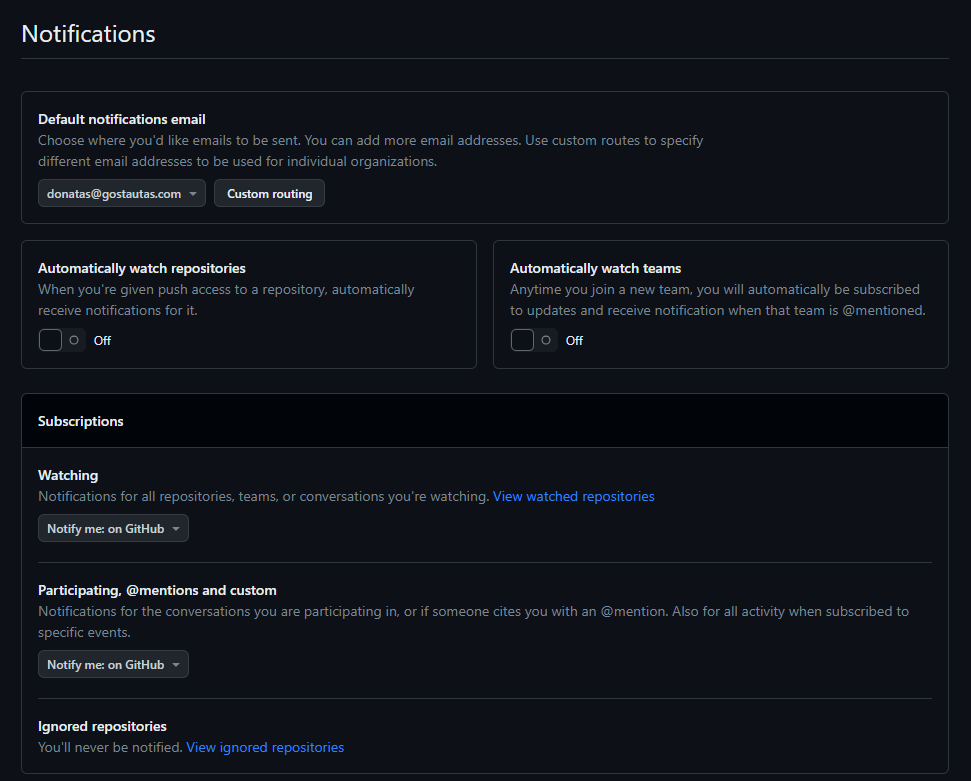
If you keep receiving a lot of notifications after changing these settings, you should go ahead to the Github subscriptions page and unsubscribe off everything. Having a blank slate you can then only get notified about repositories you are actually participating in.
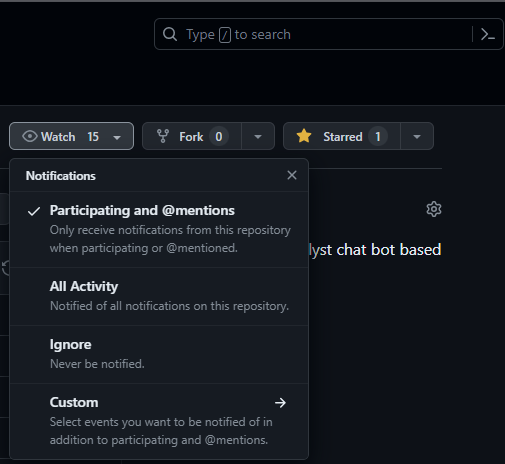
To stay in the loop with the repositories you want to track, simply click on the Watch or Star in the top-left-corner
within the repo view.
Once all of this is done, you will have an actionable notifications, which should be reviewed on a daily basis.
More info on using Notifications workflow can be found here.
Github Actions
Another thing that you'll definitely encounter often and early in your journey is the Github Actions - the CI and CD part of Github. Having pipelines is useful to make sure the code is linted, tested as well as making deployments and backups and whatnot. Therefore, you should dive into the concept as soon as you can and you can start by checking out the Github marketplace
Usually, the actions are being done by the runners after you merge to main, although some actions could be set-up to run
on any push to any other branch. However, it all happens remotely and sometimes it can make it difficult to troubleshoot.
For example, if the worker doesn't pick an action to run it could be because it's busy, but it could also happen if an
incorrect image is selected within the runs-on key.
    _runs-on: ubuntu-18.04_
    runs-on: ubuntu-latest
Luckily, there's an option to test the Github actions locally. First, make sure to download, install and run the Docker
Desktop / Engine. Afterwards, you should either use scoop or brew to install the act package.
    scoop install act
    brew install act
And then, if you open a terminal in your repository's directory, you can manage your Github Actions in any way described at act documentation. For example if you want to list all the available actions for the particular repository, you should run:
act -l
If you want to test an action named analyze that is using ubuntu on Windows or Mac you should run:
act -j analyze -P ubuntu:latest=-self-hosted
Any feedback is very much welcome regarding this workflow
Git
Conventional Commits
To make our repositories clean, clear and nice to work with, we use the Conventional Commits guide for our branching/commit messages. Make sure to take a look, but
tl;dr;
- consistency is the key
- use
fix:,feat:,chore:prefixes for commit messages (more prefixes are available) - use
fix/,feat/and so on prefixes for branches - Use present tense instead of past tense, ex: "Update user interface", not "Updated .."
Signing commits
To contribute to certain organization repositories, you are required to sign your commits. Signing commits is a process that verifies the identity of the committer to prevent impersonation. The platform team has created a guide on how to do this, which can be found here.
WSL & CyberArk
If you wish to set up WSL (Windows Subsystem for Linux) in your windows laptop, you first need to elevate your privileges
with CyberArk EPM. Go to the request-center and search for cyberark epm in Tilgangselementer > Roller. Once you
have access, install the app from your Software Center.
To open PowerShell with elevated privileges you need to do so from the shortcut:
- Search for PowerShell in windows search
- Open file location
- Right Click > Run with Elevated Privileges - CyberArk EPM
To install WSL you can follow the guide here.
Backups
Computers are known to work until they no longer do. It is recommended to ensure that backups are being stored on the cloud. Our computers are syncing with the OneDrive, which could help restore many files without additional configuration. However, one must ensure that the backups are being made, thus we present you a couple of strategies for the most important tools.
VSCode
If you download your VSCode from their website or using the Scoop/Brew, it will allow you to sync the settings directly to the Github Account you're using. Thus none of your extensions and custom configuration shall ever be gone.
However, make sure not to use the Software Center version of VSCode, since it is too old and doesn't support the Settings sync.
More information on VSCode settings sync can be found here
Pycharm/Jetbrains
You should setup settings sync in pycharm, to automatically sync your settings across your jetbrains products/pycharm
IDE instances. Alternatively you can export the settings and store them in the cloud.
Recommended extensions
| Extension | VSCode | PyCharm | Additional notes |
|---|---|---|---|
| ruff | ruff-vscode | ruff-pycharm | Automatic code formatting and linting |
| env | env-vscode | env-pycharm | .env file highlighting |
| indent-rainbow | rainbow-vscode | rainbow-pycharm | Makes indentation easier to read |
| jsonnet-language-server | jsonnet-vscode | jsonnet-pycharm | Formatting, highlighting for jsonnet |
Scoop
Backup your packages and buckets in scoop by simply running
scoop export > scoop.backup
Brew
A great tutorial on backing up the Brew taps and casks can be found in this guide
Make sure to store Scoop/Brew backups in a directory that's being synced with OneDrive
Code
Lastly, if you keep your code directory in a directory that is being backed up by OneDrive, you should be able to quickly sync your new computer to continue where you left off.
You can also sync your Downloads or any other folder, since we're all given a whooping 1TB of cloud storage.
Recommended links
With the thought of DRY in mind, we suggest you reviewing other documentation that should definitely come in handy: